HTML 부모-자식 구조 살펴보기
> HTML 태그는 누가 누구 안에 있느냐를 이해하는 것이 가장 중요하다.
> 자신을 감싸고 있는 태그가 바뀌면, 그 안의 내용물도 모두 영향을 받는다.
> 즉, 박스를 옮기면 안의 내용물도 함께 옮겨지는 것과 같은 원리이다.
<!DOCTYPE html>
<html lang="en">
<head>
    <meta charset="UTF-8">
    <meta http-equiv="X-UA-Compatible" content="IE=edge">
    <meta name="viewport" content="width=device-width, initial-scale=1.0">
    <title>Document</title>
</head>
<body>
    <div>
        <div>
            <button>나는 버튼 1</button>
        </div>
        <div>
            <button>나는 버튼 2</button>
        </div>
    </div>
</body>
</html>
여기서 복습!
head안에는 페이지의 속성 정보를, body안에는 페이지의 내용을 담는다.
head에서는 페이지의 속성을 정의하거나, 필요한 스크립트들을 부른다. 즉, 눈에 안 보이는 필요한 걸 담는 것이다.
이렇게 해서 저 코드를 통해 open with live server 를 클릭해서 구현하면

이런 식으로 나온다.
CSS의 기초
CSS는 <head> ~ </head> 안에 <style> ~ </style> 로 공간을 만들어 작성한다.
<!DOCTYPE html>
<html lang="en">
<head>
    <meta charset="UTF-8">
    <title>Document</title>
    <style>
        .mytitle {

        }
        .mybtn {

        }
		.mytxt {

        }
    </style>
</head>
<body>
    <h1 class="mytitle">로그인 페이지</h1>
    <p class="mytxt">ID: <input type="text"/></p>
    <p class="mytxt">PW: <input type="text"/></p>
    <button class="mybtn">로그인하기</button>
</body>
</html>
이 코드를 보면 head 부분에 style이 들어간 것이 보인다.
style 안에는 .my~~ 이런 식으로 적혀있는데 클래스로 내가 무엇을 바꿀 것인지 지정해주는 것이다.
밑에 body에 class로 어떻게 지정되어 있는지 보이는 데 이걸 head 부분에 가서 바꿔주는 것이다.
mytitle라는 클래스를 가리킬 때, .mytitle { ... } 라고 써줘야 하는 것을 꼭 기억하자.
그래서 조금 꾸며보도록 하자. 그리고 박스는 div다!!
<!DOCTYPE html>
<html lang="en">
<head>
    <meta charset="UTF-8">
    <title>Document</title>
    <style>
        .mytitle {
            color: red;
            font-size: 40px;
        }
        .mybtn {
            font-size: 12px;
            color: white;
            background-color: green;
        }
		.mytxt {
            color: red;
        }
    </style>
</head>
<body>
    <h1 class="mytitle">로그인 페이지</h1>
    <p class="mytxt">ID: <input type="text"/></p>
    <p class="mytxt">PW: <input type="text"/></p>
    <button class="mybtn">로그인하기</button>
</body>
</html>
여기서 ; 이 표시는 필수.
이렇게 하면 아래와 같이 나온다.
CSS에 대해 더 알아보자.
margin, padding
> margin과 padding 속성은 각각 바깥쪽 여백, 안쪽 여백을 의미한다.
> margin의 방향은 위 오른쪽 아래 왼쪽 즉, 시계방향이다.
text-align
> 텍스트의 정렬 방향
> left : 왼쪽 정렬 / right : 오른쪽 정렬 / center: 중앙 정렬 / justify: 양쪽 정렬
<html>
<head>
<style>
	#box1 { text-align: right; }
	#box2 { text-align: left; }
	#box3 { text-align: center; }
</style>
</head>
<body>
	<div id="box1">오른쪽 정렬</div>
	<div id="box2">왼쪽 정렬</div>
	<div id="box3">중앙 정렬</div>
</body>
</html>
이렇게 해서 결과를 보면
border-radius
> 테두리를 둥글게 만드는 속성이다.
> 사용하는 방법은 크게 3가지로 볼 수 있다.
> 예 : boder-radius: 10px / 50% / 20px 0px 30px 10px
10px 로 할 때
사각형의 모서리들이 정갈하게 나있는 걸 확인할 수 있다.
50%로 할 때
원에 가까운 형태를 확인할 수 있다.
20px 0px 30px 10px 로 할 때(왼쪽-위 부터 시계 방향)

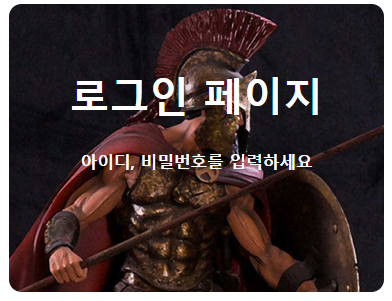
이렇게 해서 로그인 화면을 만들면
<!DOCTYPE html>
<html lang="en">

<head>
    <meta charset="UTF-8">
    <meta http-equiv="X-UA-Compatible" content="IE=edge">
    <meta name="viewport" content="width=device-width, initial-scale=1.0">
    <title>Document</title>
    <style>
        .mytitle {
            background-color: green;

            width: 300px;
            height: 200px;

            border-radius: 10px;
            color: white;

            text-align: center;

            padding: 30px 0px 0px 0px;

            background-image: url('https://www.ancient-origins.net/sites/default/files/field/image/Agesilaus-II-cover.jpg');
            background-position: center;
            background-size: cover;
        }
        .mybtn {
            margin: 20px 20px 20px 20px;
        }

    </style>
</head>

<body>
    <div class="mytitle">
        <h1>로그인 페이지</h1>
        <h5>아이디, 비밀번호를 입력하세요</h5>
    </div>
    <p>ID : <input type="text" /></p>
    <p>PW : <input type="text" /></p>
    <button class="mybtn">로그인하기</button>
</body>

</html>
이렇게 나온다.
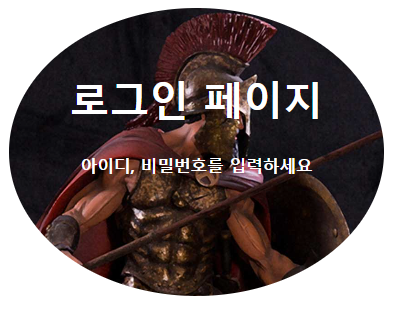
근데 저 로그인 화면을 웹페이지 중앙에 옮기고 싶다.
그럴려면 저 로그인 페이지를 포함한 요소들을 <div></div>로 감싸주고
.wrap {
            width: 300px;
            margin: 20px auto 0px auto;
        }
이런 식으로 코드를 짜주면 된다.
margin: 20px auto 0px auto;
위로는 20px 떨어트리고 오른쪽으로 쭉 밀어주고 밑으로는 띄울 필요없고 왼쪽으로 쭉밀어라 라는 뜻이다.
해서 결과물은

참고로 이 모든 내용은 스파르타 코딩클럽에서 자세히 배울 수 있다.
복습도 스파르타 코딩클럽에서 하는 웹개발 종합반에서 배웠던 걸 기반으로 하고 있다.
'웹 > 웹개발 종합반' 카테고리의 다른 글
| 웹개발 1주차 복습 (주석, 파일분리, 부트스트랩) (0) | 2023.03.07 |
|---|---|
| 웹개발 1주차 복습 (폰트 적용) (0) | 2023.03.05 |
| 웹개발 1주차 복습 (웹 브라우저, HTML) (0) | 2023.02.27 |
| 웹개발 4주차 (2) (0) | 2023.02.13 |
| 웹개발 4주차 (1) (0) | 2023.02.12 |